How to Build a Timber Raised Pond for Your Garden

Timber raised ponds can create a beautiful water feature centrepiece for your garden. With a raised structure you can have an instant garden pond in your garden, patio, or deck without the need for landscaping. They are great for complementing a raised vegetable garden or for attracting birds and wildlife. You can also set up a stand alone pond for koi or fish.
A raised timber structure may not be the first thing you think of when you visualise an outdoor pond. However it can have certain advantages over a 'sunken' or excavated pond.

The Advantages of a Raised Pond
- Eliminates the need for digging and measuring a hole
- It's safer for small children and pets or animals will be less likely to accidentally fall in.
- If you're feeding fish or tending to pond plants, you have a more easy and accessible height to work from.
- They can really suit some garden layouts and add to a neat, ordered aesthetic appeal.
- You won't need to worry as much about soil runoff or debris, as the pond area is closed off from its surroundings.
- Needless to say, a timber pond can allow you to have a water feature even if you only have a small outdoor space such as a deck or patio.
Our raised pond kits are essentially a thick timber frame with a strong pond liner to prevent any leakage. They can be placed on any surface, from concrete and tarmacadam to paving, earth, and landscaping stones.
Timber Garden Ponds
OK, so while we are going to show you how to build a pond it might not be one as elaborate as the ones you have seen elsewhere. Our expertise is providing manageable pond sizes which can be put together quickly and are easy to maintain.
We specialise in timber raised ponds made using very strong interlocking timber boards. These are easy to construct without using fixings, making it a mere afternoon project from start to finish. We also supply pond liners, pond pumps and other accessories to help you build a beautiful and practical addition to your garden.

I will go through the process of how to put one of our pond kits together in written form but we have also made a video (above, featuring yours truly) to show the process in glorious technicolour.
Note: The following blog post describes how to put together one of our Avon Raised Bed kits. We also have different variations of timber ponds on our site with slightly different designs, as well as a range of sunken garden ponds. See here.

Avon Raised Pond With Liner - 4ft x 4ft
View ProductHow To Build a Raised Pond
As you can see in the video, building our wooden pond from the provided kit is very simple. The machined pieces of pressure-treated timber simply slot together, with the tongue part fitting neatly into the groove. I would stress that the parts are such a tight fit that it is very difficult to take it apart again without damaging the timber. Therefore it is important to ensure your boards are in the correct order before assembling your pond.
Regardless of the size of bed you are constructing, the profiles of the boards will be the same - only the length will vary. There are four types of board as follows:
- Half board with tongue
- Half board with groove
- Full board with tongue and groove
- Full board with groove and flat edge

To begin construction, lay a half board with the tongue facing upward (as shown in the above photo): this will form one of the gable ends of the pond.
Next fit the side pieces (using the full boards with tongue and groove) on to the ends by hammering them home with a mallet, again ensure the tongue part faces upwards.
I like to use a piece of scrap timber placed on top the board so I am not hammering it directly (and damaging the tongue profile). If you are building on gravel or another uneven surface, you may find it handy to place one of the side boards under the board you are hammering as a temporary base.

Add the opposite gable end and then work your way around the bed, adding boards by fitting the tongue inside the groove, until you have reached the desired height. Keep any timbers with a smooth edge (no tongue) until the end (you will have four per bed), as these make up the final tier; and leave the top flush.
The process is simple, quick and easy but will take a bit of hammering to slot the timbers properly home. You will notice that the precision manufacturing process works to very tight tolerances so that the finished bed is rigid and incredibly strong.

Avon Raised Pond With Liner 6ft x 4ft
View ProductTo finish your garden pond construction, add the four boards with the smooth edge (no tongue) and hammer down well.
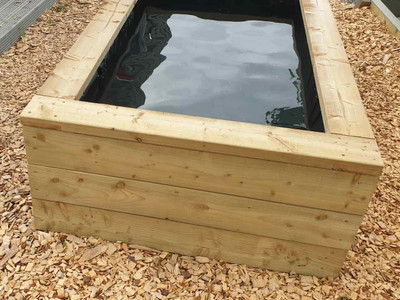
The pond liner material is added next and simply laid inside the timber structure. It is a good idea to add a layer of sand to the base of the raised pond at this stage to avoid any damage to the pond liner.

Try to achieve a neat fit with the liner by folding it neatly into the corners. For large ponds it is a good idea to half fill the pond at this stage; this allows the weight of water to seat the liner properly before fixing around the top.
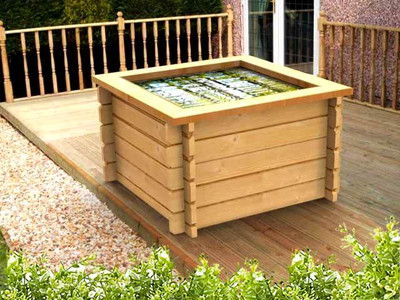
Once you are happy with the fit and the corner folds, you can fix the liner around the top of the pond using a staple gun or slate nails. The top of the liner will be concealed by the finishing seat frame so a perfect job is not essential - but try to avoid thick folds of fabric as they will get in the way when fitting the frame.

Place the frame on the pond to test fit, and make sure the corners are neatly lined up. If you are installing an electric pond pump, the power cable can be fixed under the frame by cutting a small groove in the top board.
The frame is attached to the raised pond structure by screwing through the frame into the timber below. It will help to draw a line in pencil on the corners at the midpoint of the boards underneath: this ensures your screw fixes accurately through the center of the boards.

Once your pond is finished it can be completely filled with water and is ready to use. A water feature is a great addition to your garden as it attracts beneficial wildlife, which in turn help control common garden 'pests'. Our ponds are also large enough to stock with fish like koi or goldfish - but be aware that for a fish pond you will require a pumped waterfall or fountain to aerate the water.
Pumps and filters will vary depending on the contents of your pond. There are 2 main types of filter: a biological and a mechanical version, with most modern filters being a 2-in-1 design. A mechanical filter cleans debris and algae from your pond, while a biological unit helps break down pollutants like ammonia and fish waste.
To have a pond with clear water you need a mechanical filter as a minimum requirement, and if you have fish or frogs you will need a biological filter to keep the water safe.