A guide to polytunnel irrigation

This might seem an odd time of year to talk about irrigation but if you are thinking of adding a watering system to your polytunnel or greenhouse now is the time to get it done. Irrigation plays a crucial role in the polytunnel, as your indoor crops won't be benefiting from natural rainfall and are more reliant on you.
A number of options are available when it comes to polytunnel irrigation, but in our view the best solution is either a soaker hose or a dripper system which runs at soil level. With these methods there will be less water wasted through evaporation, a potential pitfall that can be magnified in the warmth of a polytunnel. You will also reduce fungal problems on wet leaves.

Obviously soil level irrigation is much easier to install before the plants go in. Both systems are easily attached to a garden tap or hose and are simple to join together and achieve whatever configuration you may need.
Key Benefits of a Polytunnel Drip Irrigation System:
- It will save you time.
- A drip system can deliver water more effectively, directly to your plant’s root zone.
- Set the timer to come on early in the morning when it is cool so water soaks into the soil rather than evaporating.
- A drip system can deliver a more precise amount of water, and it will be more consistent than hand watering.
- You can go on holidays!
- Less risk of fungal disease from wet foliage.
- The localised delivery of water means that you won't be wetting the surrounding soil unnecessarily. In turn this will give weeds less of a chance to get a foothold.

What About Sprinklers?
A sprinkler system is often used for polytunnel irrigation (particularly in commercial settings where crops are grown at scale), but it can have a number of downsides. For one, the enclosed polytunnel structure is more prone to high humidity levels than outdoor growing conditions. Combine this with a watering system that wets the foliage from above and you can see the potential issues. Warm and damp conditions can create favourable conditions for mould or fungal disease. Aside from that, sprinklers are not the best system if you're looking to conserve water. It can depend on the temperature, but some water will evaporate before it can be taken up by roots, while water is often being spread over bare patches of soil as well as plants.
Even and Measured Watering
Uneven watering puts plants under stress and leads to bolting (running to seed), woody roots (beetroot) or splitting (carrots and tomatoes). If you are anything like me watering can be patchy at the best of times, especially when things get busy and you don't have the time to do it properly. Water evaporates quickly from the soil surface, especially in hot weather, so there may be less than you think getting to you plant roots. If I was to give you one tip on polytunnel growing it is even watering, it really is the key to producing the best crops.

How To Set Up a Drip Irrigation System for your Polytunnel
Setting up a drip irrigation system can seem complicated, but it is actually very simple and easy to do once you understand it. It is really plumbing for kids! All you will need is a Stanley knife to cut the pipe; everything else just slots together and is tightened by hand. I quite enjoy working out the systems to be honest, so if you need a hand let me know or use the contact form on our site: I can draw you up a plan and give you a parts list for everything you need.
Basically you start from your water supply (tap or hose) end where you can add an optional timer or filter if you need one. The water is then carried to the area you want watered using a supply pipe (black, no drippers) where it connects into your irrigation pipe (brown, with drippers). You can have as many dripper lines as you wish and can send them any direction you like using the range of T pieces, connectors and elbows etc.

The dripper pipe comes with tiny valves embedded in the tube every 30cm which irrigate at a rate of 2.3 liters an hour. If you are running up and down beds it is best to place your lines 30cm apart. If you have large (and thirsty) plants like tomatoes or cucumbers you can run a separate ring around the root area of each plant by taking a 'T' off the supply line and using another 'T' to loop around the plant as shown above.

16mm Dripper Irrigation pipe - 10m
View ProductYou can further control your network by adding in line valves at each sub section. This allows you to turn off areas that don't need watering as much as the more demanding plants. They are easily added by loosening the ring clamp, cutting your irrigation or supply pipe and pushing each cut end into either side of the valve. You can also place valves within individual beds for an even more targeted delivery.
Pegs can be used to secure the dripper pipe and stop it from moving.
The system is re-usable, ultra-adaptable and can be extended where necessary.


Drip Irrigation System - 16mm Parts Picker
View ProductIf you would like to order irrigation parts I have arranged them on a single page on our website to make it easy to build a system and check the total as you go. The image above is for illustrative purposes but on the live site you can click on the blue 'i' buttons for any more information on any of the fittings.
Using Drip Irrigation with Raised Beds
If you are growing in raised beds in your polytunnel, we have now added some drip irrigation kits and plans for the most common raised bed sizes. These kits are quick and easy to install, with push-fit connectors and an uncomplicated layout. The dripper lines are spaced 30 cm apart and 15cm from the edge of the bed. Dripper and supply pipes are both 16mm.

8ft x 4ft Raised Bed Irrigation Kit
View ProductA valve is included with every raised bed plan, allowing you to restrict the water supply to individual beds, or temporarily close a bed off from the overall system (depending on plant needs).
Note that filters and timers are not included within these kits and are sold separately on our site.

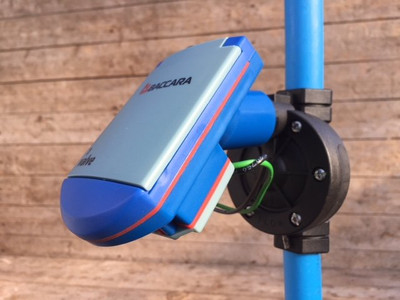
A word on timers
We have had a lot of trouble with domestic water timers in the past so have decided to stock the professional units we use in our own gardens. These units are obviously more expensive than their domestic cousins but they will last for years without giving you any trouble. The common problem experienced with timers is that the valve unit eventually leaks into the control box and ruins the unit. The professional 'Baccara' units we stock are different, because the control box and valve unit are separate parts and made to professional standards.
Given that an automatic system is supposed to give you peace of mind when at work or away on holiday, I feel it is well worth investing in a reliable timer. Yes, they are nearly twice the price - but they will last at least 5 times longer and give you the confidence you need.


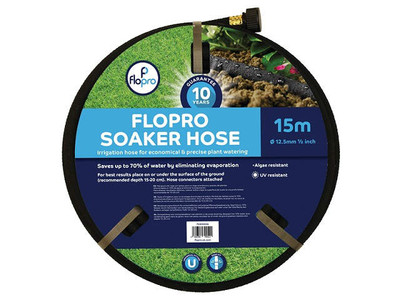
Flopro Soaker Hose 15m
View Product
Using a Soaker Hose in the Polytunnel
Soaker hoses won't be quite as efficient as drip irrigation when it comes to water conservation, but aside from that they are a very effective alternative method. A soaker hose is made from a porous material that essentially 'sweats' water, resulting in a very distinctive appearance. They can be placed along the soil surface, buried slightly or covered with a mulch (the latter can further safeguard against water evaporation in the warmer polytunnel environment).
Soaker hoses are connected to your water source in much the same way as with a drip irrigation system, but overall it's a simpler system with less parts. Because the water seeps out along the entire length of the hose (as opposed to the spaced-out emitters on a dripper pipe), the delivery of water to the soil is less accurate or concentrated. Thus if you want to make the best and most efficient use of a soaker hose it should be placed along rows or vegetable beds. Whatever way you lay it out though, it's still going to result in less water waste and reduce the chances of fungal problems. This is because the water seeps straight into the soil, and from there the plant roots can take up what they need.

Alternative Watering Methods
Of course, you don't have to take our advice on the best watering method. Other options include:
Hand Watering Watering using a can, hose or a rose attachment might seem relatively old-fashioned but it is a very meditative way to spend some time in the polytunnel. You also get to monitor the health of your plants as you go. Watering the soil at the base of the plant is generally better than watering from above. It can help to have a nearby water source to save you from doing too much walking back and forth.
Capillary Matting A capillary mat system can work really well in the polytunnel if you are growing plants or starting seedlings off in pots. The plants or pots are placed on the matting, which absorbs moisture from an underlying reservoir of water that you top up every so often. This wicking action can be achieved with a small section of fabric that extends from the mat into the reservoir. This simple system leads to even, efficient watering.