Quickcrop Vegetable Garden Plan
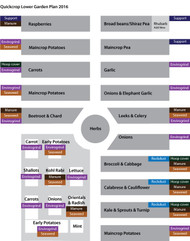
Raised bed vegetable garden plan. I include my 2016 vegetable garden plan below if anyone is interested in what I'll be growing next year. My garden is now split up into long raised beds with gravel paths in between primarily because I need to make it as low maintenance as possible due to the limited amount of time I can spend there. I also have an area of taller Quickcrop raised beds which we use for photos and videos (you can see this in the bottom left of the plan), I use these for carrots and parsnips where the rotation plan allows. I try to keep the soil covered as much as possible due to high rainfall in my area both to protect it and to keep weeding to a minimum.

My large raised beds are simple constructions made my shoring up piles of earth with timber planks held in place by hammering stakes into the ground, a cheap and relatively quick way of making raised beds. I have also made the beds a little wider than normal at 1.5m to fit our 'Growgrid' planting mats which makes crop care a whole lot easier.
Drawing a plan in Autumn It is well worth drawing up a plan of your garden in Autumn for the following year as bulky soil feeds like compost, manure or seaweed should be added now to allow them to break down over Winter. Different plants need different feeding regimes and you need to know what to add and where to add it; cabbage family plants, for example, are heavy feeders and will thrive with an application of manure while carrots should not be manured as it causes them to fork.

I find September/October the best time to prepare the garden for next year as you won't want be outside when the weather gets very cold from November until March. It is not a good idea to work wet soil as it damages the structure so now is also a good time to add whatever soil amendments you require for next year while the ground is still relatively dry.
You may also need to build or move supports or covers, Autumn days are a good time to do this rather than braving colder weather later on and you have the advantage of everything in place for an easy start next year.
My garden plan for 2016 The grey blocks are my large raised beds which are 1.5m wide x 6m long. The soil was poor at the start and consisted of a thin layer of sticky grey clay, I used raised beds as it is wet site and have essentially built a layer of fertile material on top of the clay which is gradually becoming mixed due to earthworm action and me digging potatoes.

Usually I work an approximate 3 year rotation (not growing a plant from the same family in the same place for 3 years) by splitting the garden into three sections (top left, top right and bottom right) and moving each family in one block every year.
This year I am mixing it up a bit because I want to increase my rotation to 4 years and I want to separate my potatoes to see if it helps contain the spread of blight. Manure My supply of manure has been cut quite drastically this year which is no harm as I was probably adding a little too much anyway. I have had issues with 'thick neck' on my onions and potatoes 'going into leaf' both of which are due to overfeeding so I am being far more selective this year.

I am only adding manure to the Brassica (cabbage family) section of the garden and to areas of particularly poor soil. Use well rotted manure which should have little or no smell and add to the surface of the soil, there is no need to dig it in as the worms will do that for you.
If you are having difficulty getting manure locally we can supply two good brands of horse manure ' Lady Muck' and 'Gee Up' both of which are produced in Ireland.

Envirogrind/Garden Compost Envirogrind is a supercharged version of garden compost with added fish waste but neither is as high in Nitrogen as manure so good for use where we don't want excessive leaf growth in plants like onions, potatoes or carrots.
You read what one of our customers says about Envirogrind below, it is excellent for feeding soil and improving structure and is particularly good for onions, garlic and potatoes. Add Envirogrind or Compost to the surface of the soil rather than digging in; if the soil is poor you are better to dig it through to improve the structure for the first few years then add to the surface as conditions improve.
Where I show Envirogrind in my plan I am generally using a mix of Envirogrind and home produced garden compost made from garden and kitchen waste.
Rockdust Rockdust is very finely ground basalt and is used to add minerals to your garden soil. I did some trials in 2014 with some Brussels sprout and broccoli plants and noticed a marked difference in the vigour and general heath. I forgot about it last year (another good reason to draw a plan now!) but will be adding it to the surface of half of my brassica beds this season and will document the results.

Seaweed I'm lucky because I live near the coast so use seaweed a lot in the garden, remember my soil was particularly awful so I needed to add large amounts of organic matter to build my own. Seaweed provided me with nutrients but also plenty of bulk which has broken down into quality compost.
If you can get your hands on seaweed I'd advise you to use it as it's packed with micronutrients and enzymes which feed your soil and strengthen the immune systems of your plants. It is illegal to cut seaweed from the rocks but the fresher you can get it the better, I wait for a bad storm and go down the next day and gather the fresh stuff from the shore.
Don't worry about the salt, there is far less than you would think and it is quickly washed though the soil. The proof is the amount of earthworms you will find under it as its breaking down, if it was salty they wouldn't be there.
I tend to cover most of the garden in Autumn as the seaweed also acts as a protective mulch over the soil which prevents nutrients from leaching through from heavy winter rain. Any bits of dried seaweed which remain in the Spring get added to the compost heap where they dutifully disappear.

Covering with Mypex This year after covering the beds with seaweed I am also covering with Mypex weed protection barrier to prevent any weed growth and to see if the seaweed breaks down quicker.
I have become very protective of my soil (well I did have to build it...) and don't like to leave it unprotected over the Winter; if you think about it any soil in the open would naturally be covered by grass or other vegetation so we have a duty to cover any soil we have artificially made bare!

Using Growgrid As I mentioned I have made my beds 1.5m wide to suit our GrowGrid planting mats as I never get to spend enough time in the garden as like so want to keep weeding to a minimum.
GrowGrid is a range of Mypex sheets with pre punched and heat sealed planting holes at a variety of spacings. I use mat 'D' for overwintering onions and 'A' for garlic and put them down now. In Spring I use mat 'C' for large brassicas as it's prefect for keeping the wide gaps weed free while the plants are finding their feet.
By the way, Niall pointed out a cracking review for 'Growgrid' and 'Envirogrind' on our site this morning as follows:

Jeff Erton, Fife. I bought two large sheets of Growgrid earlier this year in conjunction with 10 sacks of Envirogrind as my soil is pretty poor. In the last few years I have been pleased to get a couple of dozen onions.
This year I have well over a hundred and three or four times as many shallots and the size is amazing with onions approaching the size of my clenched fist! Taking up about a quarter of my plot I never had to weed once - now that's amazing.... I'll be investing in a couple of additional sheets in the spring too - I just want it everywhere!
I think that says it all!
Building Pea and Bean Supports This is more for me than you as I'm hopeless getting things done on time, my family like to keep track of all the things I haven't done much to my delight! I ended up with a third of my pea bed empty this year because I never got round to building the supports, it just gets so busy in the spring. Why not build all your supports now while the weather is nice so you are ready to plant in Spring? That's a plan.

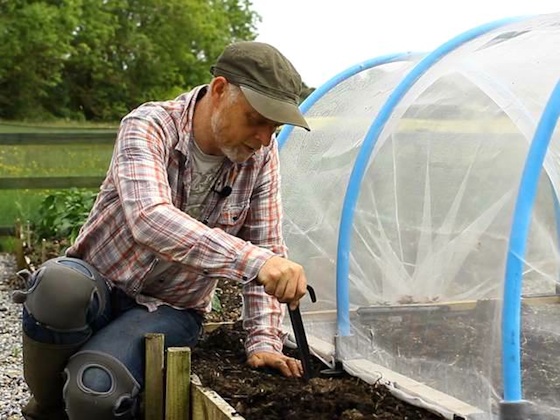
Building Hoop Bed Mini Tunnels I had great success with the mini mesh tunnels I built this year to protect against carrot and cabbage root fly so as with the supports I'm going into full production now to be ready for Spring.
Hoop covers prevent cabbage root fly from destroying your seedlings and also protect against cabbage white butterfly later in the season. I will be covering at least two of the cabbage family beds and also use to protect my carrots. Here, have a look at the video we made below:
As you may have heard we now have an exclusive kit that allows you to make these tunnels quickly and easily with all the materials you need supplied in our shop. The tunnels can be made to any size you like using our unique system; they are very strong, light and can be used with a choice of covers depending on the application. The covers can also be moved around the garden so will follow my rotation from year to year.
You can build your own mini polytunnel using our new ' Mini Polytunnel Builder' product by clicking the link.

